Somewhat reminiscent of Italian tortellini, but without cheese, pelmeni dumplings are a Russian staple. If you live in a metropolitan area, there is a good chance you can buy these pre-made at your local supplier of Eastern-European cuisine (likely in the frozen section). Living where I do, I am obliged to DIY… and while these are undoubtedly time-consuming to make, they are a delicious crowd-pleaser and store perfectly in the freezer as a “Foodie Freezer-Meal”. Traditionally, these are made en masse, and the entire family is enlisted in filling the delicate dough circles, and forming them into countless dainty, meaty morsels. Various meats can be used to fill, but the most traditional are beef or pork… my recipe calls for a mix of the two! To add to your traditional Russian spread, I humbly recommend my borscht recipe as an accompaniment.
This recipe is in two parts: first the dough, then the filling. I hope you enjoy making (and more importantly, eating!) these delectable dumplings. If you give them a try, I would love to hear how things went in the comments!
Watch me make them on my YouTube channel!
1. Dough
My preferred version uses bread flour, but it is totally fine to use all-purpose flour. It is hard to gauge how much dough I will need per batch of meat, so I usually start small, and make more if I need it.
This recipe can be halved or doubled easily, as required. Any leftover dough can be rolled very thinly and used as fresh noodles.
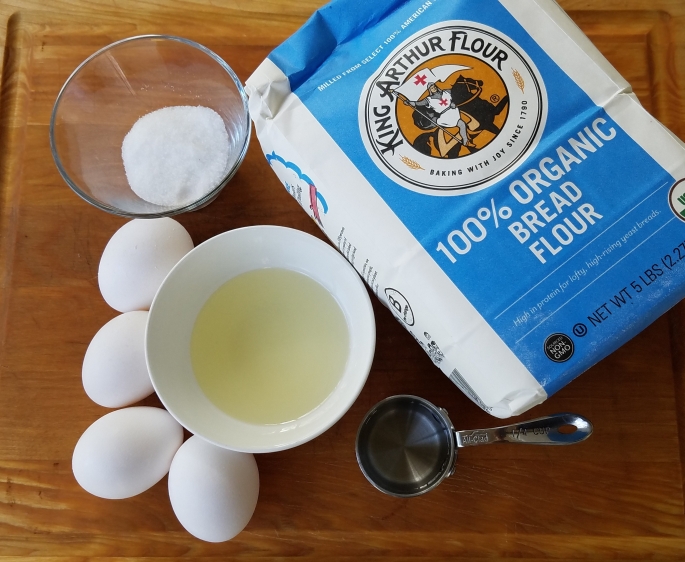
2-4 cups bread flour or all-purpose flour, plus more to dust work surface
1 generous tablespoon sea salt
4 eggs
4 tablespoons canola, or other neutral-flavored oil
¼ cup water
Start with only 2 cups of flour, and slowly add more if needed.
Add 2 cups flour to a medium bowl, making a small depression in the center, into which add all other ingredients, and mix well. The dough will likely be quite sticky.(see below)
Slowly add flour until you are able to knead the dough by hand without a great deal of sticking. Briefly knead (be careful to not over-work the dough, or it will become tough, and difficult to roll out!) until dough is smooth, and ingredients are well-incorporated. (see below)
Allow the dough to rest for at least an hour. Giving the dough time to rest helps it roll out with more ease.
2. Filling
Like the dough, the quantity of filling can be easily adjusted to your personal needs. When I make dumplings, I tend to go all-out and spend a day or two assembling a massive amount to store in the freezer for later, hence the large amount of meat shown here.
2 lbs ground beef
2 lbs ground pork
1 large onion
1 head of garlic
large bundle of fresh dill
1 tablespoon sea salt, to taste
fresh-ground black pepper, to taste
Peel the onion and grate it with the small holes on a box grater (not the teeny-tiny pinprick holes, the next size up). Transfer to a fine sieve, or a colander lined in cheesecloth or clean, tightly-woven fabric. Squeeze out as much liquid as possible. Transfer the dry(ish) remains to a large bowl. Peel and finely grate the garlic (a microplane grater is what I recommend), add to bowl. Remove any conspicuously tough stems on the dill. Some stems may remain as dill stems tend to be quite tender and flavorful anyway. Finely chop the dill and add to bowl. Add salt and meats and, with clean or gloved hands, mix all ingredients together until completely combined. This can be a fun tactile experience, gently squeezing the filling mixture through your fingers, and is much easier than doing this with a spoon.
3. Assembly
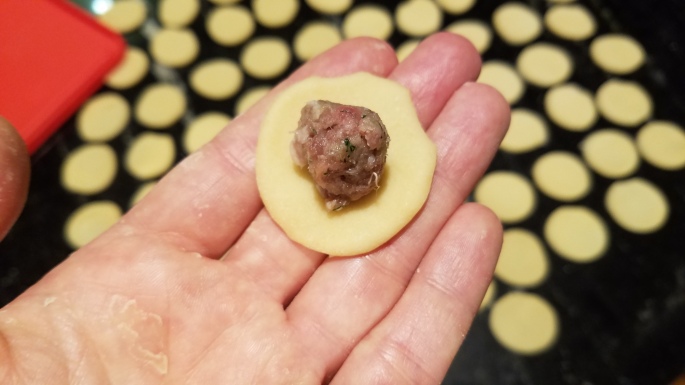
After the dough has had adequate time to rest, remove a large lump from the bowl (not too large, as the dough will dry out quickly once rolled, and is best rolled in small batches) and gently roll it out with a rolling pin until it is very thin, but not translucent, carefully flipping dough and lightly dusting with flour as necessary to prevent sticking. Use a cutting tool between 1.5-2 inches in diameter (I use the cap from an old spice bottle) to cut as many tiny circles as possible. Remove dough scraps. These may be re-used after they have been briefly kneaded and allowed to rest.
To fill dumplings, place a small ball of filling in the center of the dough circle. How much you use will depend on your skill level. Start with a small amount of filling (about ¼ teaspoon) and slowly increase as you get more practice and manual dexterity. Filling these takes practice, but you will get the hang of it! A ½ teaspoon of filling is what is pictured below.
I find I achieve better results if I place the side of dough that was against the counter-top facing up. The “counter-top side” retains moisture longer, and the extra stickiness comes in handy when sealing the dumpling.
Gently fold dough in half, over the meat and gently press the edges together to seal. It should look like a half-circle or mild crescent. (see below)

Gently brings the points together and lightly pinch to seal. Now that my older girls are beginning to help me with this task, we’ve begun calling this step the “hug step,” as I looks like the plump dumpling is giving itself a hug. (see below)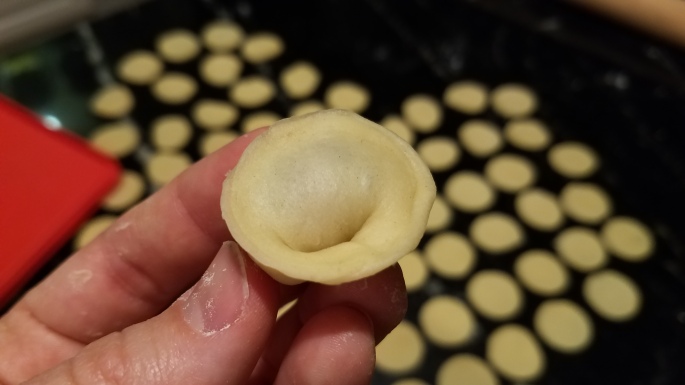
Now all you have to do is repeat this process hundreds of times to complete all the dumplings! Did I mention this job is traditionally a team-effort? If you are doing this alone, I hope you take comfort in the fact that for the past ten-or-so years I have always done this completely on my own so… I sympathize. Put on some music or a movie – preferably something Russian-themed! Two of my personal favorites are Dr. Zhivago, starring Omar Sharif, or the Russian miniseries called “Sofia”, currently on Netflix as of this writing. Both are, for the most part, pretty decent even with kids around… however there is a date rape scene, attempted suicide, and minimal violence and gore in Dr. Zhivago (it was filmed in the 60s, so it is tame by modern standards) that you may want to research before viewing in mixed company. Sofia has a beheading scene towards the beginning, and a brief sexually explicit scene towards the end… also some torture, murder attempts, and war. While this was filmed recently, it is still quite tame compared to much of what is shown on American TV. In other words, do your research before watching, but I do watch this with my kids, I just pay attention and remember to skip a couple parts.
How did this turn into a movie/TV review..? I apologize, let’s continue!
If you are making these to freeze, then arrange them as you assemble them on a large baking sheet (make sure you can fit it in your freezer), lined with parchment , without any touching, to prevent them sticking together. After freezing for a few hours, they can be quickly transferred to plastic bags and returned to the freezer. (see below)
4. Cook
Heat a pot of unsalted water to boiling. Make sure you do not fill it to the top with water, as the dumplings expand during cooking.
Once water is rapidly boiling, carefully pour fresh or frozen dumplings into pot and gently stir. Continue to gently stir for a couple minutes to prevent sticking. Once the dumplings are all floating at the top, continue simmering for 5-10 minutes until cooked through.
Drain through a colander, and toss with butter. I recommend salted Kerrygold butter for its unbeatable flavor.
Serve hot to one and all!